0 Intro
At the beginning of 2022, I penned an article detailing how to host your website on AWS, configuring the necessary resources via Terraform and establishing a CI/CD pipeline utilizing GitHub Actions.
In this piece, we’ll explore how to achieve a similar outcome by self-hosting in our own lab. While we won’t match AWS’s SLAs, and our hosting costs will exceed the 60 cents per month we pay on the AWS bill, why are we doing this?
Because I believe self-hosting applications is one of the most effective ways to learn something new. Plus, it’s enjoyable, so why not give it a try?
What you need:
- A bit of hardware with Docker/Docker-compose installed.
- A domain registered on Route53.
- The Docker image of the container where your personal website will run.
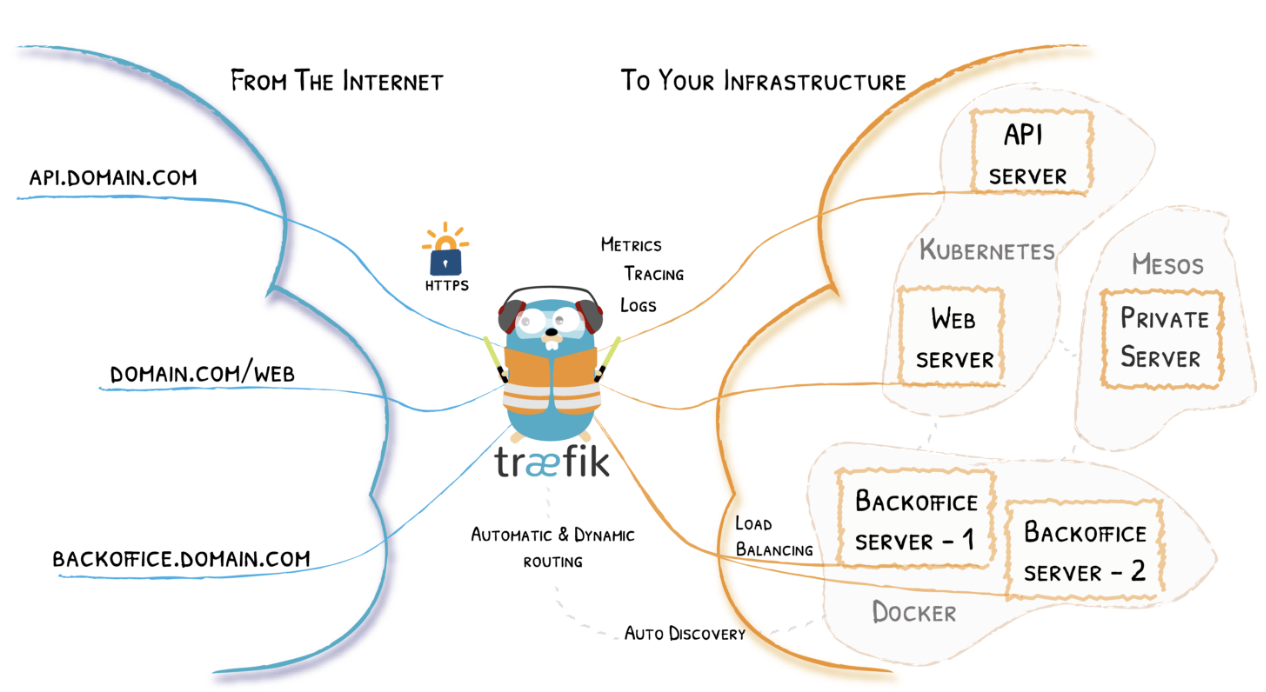
1 Architecture
Our architecture will be composed as follows:

If it seems complex, don’t worry, we’ll go over each element in detail shortly! 😄
2 Traefik
From docs:
“Traefik is a leading modern reverse proxy and load balancer that makes deploying microservices easy. Traefik integrates with your existing infrastructure components and configures itself automatically and dynamically. Traefik is designed to be as simple as possible to operate, but capable of handling large, highly-complex deployments across a wide range of environments and protocols in public, private, and hybrid clouds. It also comes with a powerful set of middlewares that enhance its capabilities to include load balancing, API gateway, orchestrator ingress, as well as east-west service communication and more”
When using Docker as a provider, Traefik uses container labels to retrieve its routing configuration.
We’ll see some examples shortly on how to use these labels to configure routes for our containers via Traefik.
3 How do we enable HTTPS?
We’re using Traefik as a reverse proxy because we can effortlessly inject SSL certificates to enable HTTPS!
For certificate validation for our domain example.com, we’ll utilize ACME (Automatic Certificate Management Environment), a protocol primarily used with Let’s Encrypt but also supported by other certificate providers.
HTTP-01 Challenge
DNS-01 Challenge
We’ll opt for the DNS-01 challenge type since we have full access to the records of our web domain.
3 DNS-01 Challenge
The DNS-01 challenge consists of the following phases:
When a request for an SSL/TLS certificate is made via ACME, the ACME server sends a “challenge” to the requester to prove control over the domain for which the certificate is being requested.
The DNS-01 challenge involves creating a specific DNS record for the domain, generated by the ACME server and provided to the requester.
The requester must then add this DNS record to their DNS server to demonstrate control over the domain. (In our case, we won’t manually add the DNS record, the process will be completely automated.)
Once the DNS record has been successfully added and the ACME verification system has confirmed its presence, the domain validation process is complete, and the certificate can be issued.
5 How do we map our public IP address to our domain?
At this point, our containers are up and running within the homelab, and Traefik is publicly exposed and ready to receive connections. However, we have a problem: how do we tell the world that traffic directed to the endpoint example.com should be routed to our homelab?
We need to associate the public IP address of our homelab with our domain example.com.
So, we’ll create a CNAME record within our domain in AWS to map it to the public IP address of our homelab.
However, as simple homeowners, we have an additional problem: our public IP address changes.
To resolve this, we have three options:
The first option involves using a DDNS (Dynamic DNS) service, which typically provides a less appealing domain to use for our website. But choosing this route would complicate manipulating the DNS records of the domain provided by our DDNS provider, making it challenging for the DNS challenge.
The second option is to map our DDNS within our web domain on AWS.
The third option is to automatically map our public IP address to our web domain. This means having a script that periodically checks what our public IP address is and, if it detects changes, maps that public IP address to our web domain. Fortunately, I wrote an article a few months ago that explains in detail how to solve this problem using a simple Docker container: How to have a DDNS if your router doesn’t support it
You are welcome!
4 Docker-compose
Now let’s put together everything we’ve discussed by creating our docker-compose.
version: '3.5'

services:
  traefik:
    image: traefik:${VERSION}
    container_name: traefik
    restart: ${RESTART}
    command:
      - --api.insecure=true
      - --providers.docker=true
      - --providers.docker.exposedbydefault=false
      - --log.level=${LOG}
      - --entrypoints.http.address=:80
      - --entrypoints.https.address=:443
      - --certificatesresolvers.${PROVIDER}.acme.dnschallenge=true
      - --certificatesresolvers.${PROVIDER}.acme.dnschallenge.provider=${PROVIDER}
      - --certificatesresolvers.${PROVIDER}.acme.dnschallenge.delayBeforeCheck=0
      - --certificatesresolvers.${PROVIDER}.acme.dnschallenge.resolvers=${RESOLVER}
      - --certificatesresolvers.${PROVIDER}.acme.email=${EMAIL}
      - --certificatesresolvers.${PROVIDER}.acme.storage=/certs/acme.json
    environment:
      - TZ
      - AWS_ACCESS_KEY_ID
      - AWS_REGION
      - AWS_SECRET_ACCESS_KEY
      - AWS_HOSTED_ZONE_ID
    ports:
      - "80:80"
      - "443:443"
      - "8080:8080"
    volumes:
      - /var/run/docker.sock:/var/run/docker.sock:ro
      - certs:/certs

  website:
    image: nginxdemos/hello:0.3
    container_name: website
    restart: always
    labels:
      - "traefik.enable=true"
      # default route over https
      - "traefik.http.services.portainer.loadbalancer.server.port=80" #needed cause default port is different from 80 DOCS https://doc.traefik.io/traefik/routing/providers/docker/#port
      - "traefik.http.routers.portainer.rule=Host(`dev.ettoreciarcia.com`)"
      - "traefik.http.routers.portainer.entrypoints=https"
      - "traefik.http.routers.portainer.tls.certresolver=${PROVIDER}"
      # HTTP to HTTPS
      - "traefik.http.middlewares.redirect-to-https.redirectscheme.scheme=https"
      - "traefik.http.routers.portainer-redirs.rule=hostregexp(`{host:.+}`)"
      - "traefik.http.routers.portainer-redirs.entrypoints=http"
      - "traefik.http.routers.portainer-redirs.middlewares=redirect-to-https"

  ddns-route53:
    image: crazymax/ddns-route53:latest
    container_name: ddns-route53
    environment:
      - "TZ=Europe/Rome"
      - "SCHEDULE=*/10 * * * *"
      - "LOG_LEVEL=info"
      - "LOG_JSON=false"
      - "DDNSR53_CREDENTIALS_ACCESSKEYID=$ACCESS_KEY_ID_DDNS"
      - "DDNSR53_CREDENTIALS_SECRETACCESSKEY=$SECRET_ACCESS_KEY_DDNS"
      - "DDNSR53_ROUTE53_HOSTEDZONEID=$HOSTED_ZONE_ID_DDNS"
      - "DDNSR53_ROUTE53_RECORDSSET_0_NAME=dev.ettoreciarcia.com"
      - "DDNSR53_ROUTE53_RECORDSSET_0_TYPE=A"
      - "DDNSR53_ROUTE53_RECORDSSET_0_TTL=300"
    restart: always

volumes:
  certs:
    external: true
To make our Traefik container accessible remotely, we need to open some ports on our modem/router and map those ports to the device where Traefik is running.
Make sure to replace the Docker image running your website with the one I’m using for the demo nginxdemos/hello:0.3.
5.1 Env variables
For the environment variables, we’ll use the .env file constructed as follows:
# Global
TZ=Europe/Rome
RESTART=unless-stopped
COMPOSE_PROJECT_NAME="traefik"

# Traefik
VERSION=latest
LOG=DEBUG

# ACME DNS-01 challenge
PROVIDER=route53
RESOLVER=1.1.1.1:53
EMAIL=<YOUR_EMAIL>

# AWS Route53
AWS_ACCESS_KEY_ID=<YOUR_ACCESS_KEY_ID>
AWS_REGION=<YOUR_REGION>
AWS_HOSTED_ZONE_ID=<YOUR_HOSTED_ZONE_ID>
AWS_SECRET_ACCESS_KEY=<YOUR_SECRET_ACCESS_KEY>

# DDNS Route 53 Container
ACCESS_KEY_ID_DDNS=<YOUR_AWS_KEY>
REGION_DDNS=<YOUR_REGION>
HOSTED_ZONE_ID_DDNS=<YOUR_HOSTED_ZONE_ID>
SECRET_ACCESS_KEY_DDNS=<YOUR_SECRET_ACCESS_KEY>
The first AWS credentials will be used for certificate validation, hence utilizing an IAM role with minimal permissions for this validation process.
The second set of AWS credentials will serve the container responsible for mapping our public IP address to our website, also employing a minimal privilege policy.
At this point, all we need to do is execute the command.
docker-compose up -d
and visit the endpoint specified in the docker-compose to see our website up and running with HTTPS enabled!

7 Conclusions
In this article, we’ve explored self-hosting our website. I should tell you that what we’ve just done is pretty cool and quite resilient, but I’m not a salesperson, so I’ll be honest: we’re far from the SLAs and costs that this architecture would have on AWS. This is one of those cases where using a cloud provider is more advantageous.
Here are some examples of what could go wrong:
- SLA (Service Level Agreement): If there’s a power outage in your home, the website becomes inaccessible. The same would happen if there were connectivity issues with your internet provider. Estimating just a 10-minute outage per month would result in 120 minutes lost per year (2 hours), bringing the SLA down to 99.86%, lower than what’s guaranteed by an S3 bucket on AWS.
- Operations: Patching and upgrading the components used in this article are your responsibility (Operating system, Docker daemon updates).
- Security: By exposing your website behind the public IP address w.x.y.z, you’re opening yourself up to a range of security issues. With this type of DNS Challenge, you’re also leaking information about dns name for your certificates, allowing a malicious user to scan your DNS and discover subdomains.